

Planning to take up film photography but not sure where to start ? Here are a few pointers to help you out :
1. Get yourself a camera. A film camera is relatively easy to find. Just ask your dad, uncle, grandma, old friends and relatives and high chances that they might have one for your for free. If luck is not on your side, there is always ebay or and some local online stores such as Film Photography Buy/Sell Community (Malaysia) on Facebook. Not sure which camera to start with , just check out my old blog post on "Which Film Camera to BUY for beginners ?"
2. Give the camera a good check up ! High chances that the film camera which was left lying for years are no longer in optimum operating condition. If it’s purchased off ebay, do check with the seller on the condition. Mint +, Mint - and Excellent are general term seller use describe their camera condition, so don’t be deceived. A mediocre condition will be graded as good with that sort of grading system. Best to do more research about the camera before investing, even more so on cameras with automation as repair would be really costly or high possibility that there is no more parts available.
Some of the frequent problems which plague mechanical film cameras are deteriorating light seals and mirror bumper, sluggish or inaccurate shutter speed, fungus on lenses and camera viewfinder, inaccurate or dead light meter and corroded battery compartment due to battery leakage. While for Twin Lens Reflex ( TLR ) and Rangefinder cameras, the focus calibration is most crucial. To check, just focus on a very far object like a high rise building and make sure it alligned properly at infinity. If it's not most likely the camera needs to be calibrated. Most of the above could easily be addressed with a simple CLA (clean, lubricate and adjustment ) from any trained camera technician for about RM150 or so depending on the condition. If the above are all good, I will normally exercise the shutter around 30 over times on all shutter speed to loosen up the camera gearing and lubrication.
3. Experiments with different films ! There are a few varieties of films out there. Basically you just need to know the format size ( 35mm and 120mm which is the most commonly used ) , ISO and film type ( color negative, slides and black and white ). Always check your camera format before buying.
For starting out, Fuji Superia and Agfa Vista are pretty good for the price. You can easily get your films at my regular photo lab ColorDotCom Digital Photo Lab, Bang Bang Geng or any available online store like ebay and etc. It’s a good beginner film to play with without burning a hole in your pocket. More professional grade films color negative films such as the the Kodak Portra and my all time fav Fuji Pro400H and Kodak Extar cost around RM 20 over per box. For black and white, I use mainly Kodak TriX400 which is my all time favorite and I prefer to do the developing on my own for the extra added contrast. In my humble opinion, that's the most versatile film ever. You could push it 3 stops and still perform reasonably well.
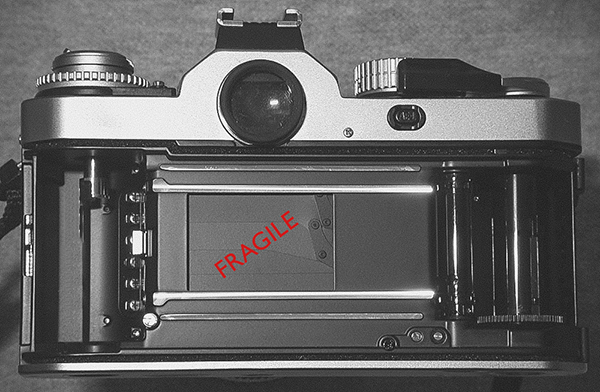
4. LOAD the film into the camera. PLEASE be EXTRA CAREFUL when loading film into any SLR or rangefinder type camera which looks something like this image below. The MOST FRAGILE part of the camera is this shutter curtain. It's actually just a thin layer of metal or cloth like material which controls by the shutter speed dial. When you are loading the film into the camera, do ENSURE your fingers stay off this middle section and don't ever apply any pressure on it else the shutter shutter will bent or break. It happens to me once on my FM2 and it cost around RM300 for a shutter replacement, ouch !
Once the film are loaded into the camera, do ensure the film winder turns ( top left as per photo below as an example ) as you cock the shutter. If it's not turning, most likely the film is not loaded properly. You can always counter double check by turning the film winder to feel if there is any tension on the winder.
5. REMOVE that roll with the upmost care ! This is the most common screw up of all time :) You wouldn't want your hard work and masterpiece gone wasted, if you are not sure read the camera user manual before operating. Trial and error doesn't work all the time ! All film camera user manual can be downloaded from this website and of course a small donation to them would do great considering the effort being taken to digitize all those manuals.
In general, just press the film release button once you are done shooting( film couldn't advance anymore ) and rewind the film as per the direction of the arrow. Keep turning until you feel no more tension on the winder, this may take around 20 to 30 turns in total.
6. Developing and scanning would be the last step. In my opinion, there are two reputable photo lab in Kuala Lumpur that does developing, one being Color Dot Com in Uptown Damansara in which I am currently using and also Bang Bang Geng in Publika. Both of them are pretty good and I am happy with the out come so far. All scanned images will be supplied in jpeg format burnt into a CD or can be transferred online. Hence it's pretty easy
7. Practice makes perfect . Don't be despair if your first few rolls doesn't turn out as nice as you wanted it to be. It takes countless rolls of film and time to master. I have burnt through many rolls of film to finally figure out the characteristic of each film.
8. Don't be overly ambitions. Stick with one film for a certainly period of time before switching. Each film has different characteristic and exposure latitude ( in digital term they call is dynamic range : ) Hence constant switching you get you more confused and it's hard for your to actually know the film well enough.